Welcome to my creative online journal

Tuesday 31 January 2012

More Valentine Crafting

I've got a new obsession and its calorie free - washi tape! It's a patterned paper tape and I LOVE it! It is so easy to use, but unfortunately not quite so easy to get hold of in the streets of the UK...yet.  I keep hinting to the shop assistants in Paperchase that they NEED to stock it in lots of colours, but they just give me this look as if they haven't a clue what I'm talking about! (sigh!)...
I used my rolls that I had left over from Christmas together with the only roll that my local Paperchase stock now, the Valentine's one that I used on my frame, to make these decorations:

 
As I say, SO EASY to use, I just wrapped the washi tape around the silver part of these nightlights.  

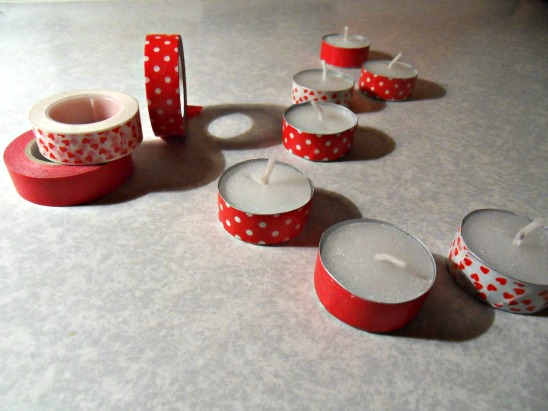
Obviously you have to take care to make sure that the tape doesn't overhang onto the candle and if it does, either lift up the tape and reposition (the beauty of Washi) or trim off any excess.  Normal safety advice applies as in always make sure that you don't leave any lit candles unattended.

Whilst I was making these (at craft group today) I also had the idea to make some mini bunting with the tape:
It was simply made by folding over a strip of the tape over the string so that it sticks to itself and then cut with scissors into a triangle shape. 

Um... what's next for the Washi Treatment...?

♥♥♥♥♥♥♥♥
Thanks for looking today,
Nicky

Monday 30 January 2012

A Heart Valentine's Decoration


'Bout time I did some more crafting, I think!  And this is what I did tonight, a decoration for our mantlepiece using a (charity shop) thick acrylic frame.

I stamped my heart and message 'Live Well, Laugh Often, Love Much' onto a piece of graph paper and then simply stuck it onto the inside of the frame with some lovely heart washi tape (Paperchase £2.50).   I then added the washi tape all around the edges of the frame.

I was going to leave it like that but thought it looked a little unfinished, and needed a bit more dimension.

Which is why I added a few handwritten hearts and the square on the front.  Plus the X's:
And am now liking the layered frames look.

******
An updated selection of books are available on my other page now.
Thanks for looking and for any comments,
Nicky


Thursday 26 January 2012

New Page


Just a quick post to say I have a new page about my weight loss journey to be found by clicking this link (below the Creative Flourishes banner):


To return to this page press Home. 


Nicky

Monday 23 January 2012

A Tip for Artists

I am back from my mini blog break and will show you what I've been up to in my absence very soon.   I need to do a few 'finishing touches' before 'whatever-it-is' is in a blog showable state.  You'll see what I mean sometime during this coming week.

But just to prove to you that I really am here I have got a tip for all you artists out there.

Yesterday I popped to our local Lidl store and picked up this charcoal sketching set (for just £5.99!):
And while it looks nice presented like this, when you come to use it the storage works out to be nothing short of useless.  You can't access the pieces of charcoal easily, they break into pieces when you try to get them out of the plastic and once you put them into the box loose they create mess everywhere! 

So my tip is, take out the charcoal and put rice in the box...:
 ..and lay the charcoal pieces on top.  It stops them all rattling about, getting broken and contaminating each other.  Clever huh?

I will need to label the box 'This Way Up' and keep it flat in storage but it is a very simple but very useful tip for the sketchers amongst us.

Thanks for looking, see you very shortly,
Nicky

Friday 13 January 2012

Diet Motivation Journal Pages

I made this two page spread using the lyrics to the song "You can get it if you really want" which I seem to have singing in my head at the moment.

It's a good song about any goal you may be wishing to achieve, not just dieting.

It goes:
"You can get it if you really want
You can get it if you really want
But you must try, try and try, try and try
Try and try, you'll succeed at last."

On the left hand page I used some magazine images that were taken from perfume adverts:
(years old, I found them in my images stash)

And on the right, I printed out the lyrics using the computer and used magazine images and a real tape measure to embellish:
  I then used a watercolour crayon with a water pen to make a wash for the background.

Here are some of the other words that also ring true when trying to lose weight: 

"Rome was not build in a day
Opposition will come your way
But the hotter the battle you see
it's the sweeter the victory.."

EDITED TO ADD THE YOUTUBE VIDEO OF THIS SONG:
'You can Get It If You Really Want' by Jimmy Cliff


I don't have lots to lose, but I've got a 40th Birthday party to go to next month so would like, if possible, to fit into a dress that I have just a little less snuggly than I do now...

Thanks for looking and for any comments,
Nicky
 

Wednesday 11 January 2012

Beermat Calendar

In my craft group yesterday I decided to make another beermat calendar that I can give to my mother-in-law when I see her today.  I also thought it would show other people in the group how they could make one too.

This was the one I made:

  Dead simple, you just cover a beermat or square chipboard with patterned paper and embellish.  Punch a couple of holes in the top and thread some co-ordinating ribbon through.  I also tend to distress my edges a bit with some sanding and ink.

I'm not a flowery person normally (but MIL is!), this one I made in 2010 is more my style:

I use it each year by just sticking on a new calendar.

So, for a personalised present, just put on a patterned paper that suits your receipient.
Today, the 11th, has a ring around it because it's my eldest son's 12th birthday.
HAPPY BIRTHDAY RYAN

Thanks for looking and for any comments,
Nicky

Monday 9 January 2012

Abstract Letters

This image started out as a photo of an unusually designed skirt I've had hanging in my wardrobe (waiting for me to get into a size 10).  It has those letters written on it and yes, I do fancy wearing it again if I ever do manage to get down a size or 3!  I added the coloured lines and frame using pixlr.com which has some great free photo effects. 

I then used picnik to play about!: 


I love playing with letters and will be putting these in my version of the Smash Book.

Thanks for looking and for any comments,
Nicky

Thursday 5 January 2012

Layers on my Painting

In my last post I showed you the painting I was doing as part of a Strathmore online course.  I wasn't sure how I was going to do the layering then, but this is what I did to it:
We weren't meant to put so much white on it - using a corrector pen - but once I started adding it I couldn't stop.  Over the last two days I did leave it alone, thinking maybe it was finished... but  then came back to it later and added more! 
This was how it was:
and this is how it finished up:
The page is a bit curled around the edges because I used acrylic paint and it was only 150gsm paper.

The course has probably moved on since I was doing this, so I'd better go and see what I need to do next!

Thanks for looking and for any comments,
Nicky

Wednesday 4 January 2012

I've Been Painting!

No, this isn't it! When I paint I can't resist taking pictures of the paints on the palette or, in this case, during the clear up stage on the laminated plastic that I was using for a palette.  Sometimes these photos end up looking better than what I am painting, lol.

The painting I was doing today was the first exercise in a free online course that I'm doing run by Strathmore (link here).  It's an exercise in layers so even though my painting looks kind of finished, it still has more work to be done to it.

It started out as misted stencilled items:
The objects on the left were what were suggested on the course but I hadn't got any tapestry cloth so rummaged around in our cellar to find some alternatives. 

Next came some paint doodling:
 I'm tied with the courses I do, in some ways I want to use exactly what the tutor is using but on the other hand I think I should be more creative and do it my own way.  And this is what I did next - the tutor, Traci Bautista, used feathers for the next part which I didn't have, so I painted on some swirls instead. 

The idea of this stage was to add acrylic paint on top of our stencils and around. 

And the next stage was to add some oil pastel doodling:
Which is where it is at now....awaiting the next layer.  Not quite sure what form that will take on mine yet....

To see how its 'meant' to look, see the promotional video for the course on youtube here. 

Thanks for stopping by today and for any comments,
Nicky

Monday 2 January 2012

DIY Solving of a UK Electrical Problem

Is this a familiar scene in your house?:
Boxes of unidentified wires and plugs, that may or may not have been put away tidily.  Some of the plugs may even be for things you no longer own.

Or maybe an extension with numerous electrical plugs in the sockets that all look remarkably similar to its neighbours?
This Christmas I found myself being the one to unplug the lights of the christmas tree and each time I did it I had to stop and think, 'which of the plugs was it?'

I remembered a long time ago that I bought some stickers for some of our plugs to label them (check out the microwave one on the right):
 
...and thought what a useful idea it was, but I don't think they are made any more.  So tonight, using Word on my computer I made myself some (none-picture)  labels:

I printed them out onto sticker paper and am now in the process of  cutting them out and sticking them onto all the plugs in our home.   They are going to be so useful for us and amongst other uses should stop us pulling out the wrong plug or will help us work out which plug is the one we need to charge up our mobiles.  I'm also going to use them in my craft room on all the assorted electicals I have there, like my heat gun and laminator.
(A useful project tip: When using this printer sticker paper, it is very helpful to use a craft knife to separate the front and back - it saves prevents the air from going blue! ☺).


Thanks for stopping by today,
Nicky
Related Posts with Thumbnails